Nest 中的 Session 与 jwt
<font style="color:rgb(37, 41, 51);">代码:nest-study\login-and-register、nest-study\jwt-and-session</font>
session 或者 jwt 都是非常常用的给 http 添加状态的方式
Seesion
session 使用的是 express 的 <font style="color:rgb(37, 41, 51);">express-session</font> 中间件在 app 上注册
1 | |
再通过 <font style="color:rgb(37, 41, 51);">@Session</font> 装饰器取出来传入 controller 里。
1 | |
上面代码每次请求返回的数据都不同,而且返回了一个 cookie 是 connect.sid,这个就是对应 session 的 id。因为 cookie 在请求的时候会自动带上,就可以实现请求的标识,给 http 请求加上状态。
Set-cookie
设置 cookie 是用 response headers 的 <font style="color:rgb(37, 41, 51);">Set-Cookie</font> 实现的。此响应头用于在用户的浏览器上创建一个或多个 cookie。
<font style="color:rgb(37, 41, 51);">Set-Cookie</font> HTTP 响应头的语法基本上如下:
1 | |
<name>=<value>:这是要设置的 cookie 的名称和值。expires=<date>:这定义了 cookie 的过期日期和时间。如果没有提供,那么 cookie 就会在浏览器关闭时过期。domain=<domain_name>:这定义了可以访问 cookie 的 web 服务器的域名。默认情况下,只有同一服务器才能读取 cookie。path=<some_path>:这定义了可以访问该 cookie 的 URL 路径。默认情况下,只有设置了 cookie 的页面及其子页面才能读取 cookie。secure:这表明 cookie 应仅通过安全(加密)的连接发送。HttpOnly:此选项意味着通过 JavaScript 等脚本语言无法访问 cookie,这有助于防止跨站脚本攻击(XSS)。
JWT
jwt 需要引入 <font style="color:rgb(37, 41, 51);">@nestjs/jwt</font> 包的 JwtModule
1 | |
注入其中的 <font style="color:rgb(37, 41, 51);">JwtService</font>,然后通过 <font style="color:rgb(37, 41, 51);">jwtService.sign</font> 生成 token,通过 <font style="color:rgb(37, 41, 51);">jwtService.verify</font> 验证 token。token 放在 authorization 的 header 里。
OAuth 2.0 的 token 格式为 “Bearer token”, 要拿到 token 便需要
<font style="color:rgb(37, 41, 51);">authorization.split(' ')[1]</font>
1 | |
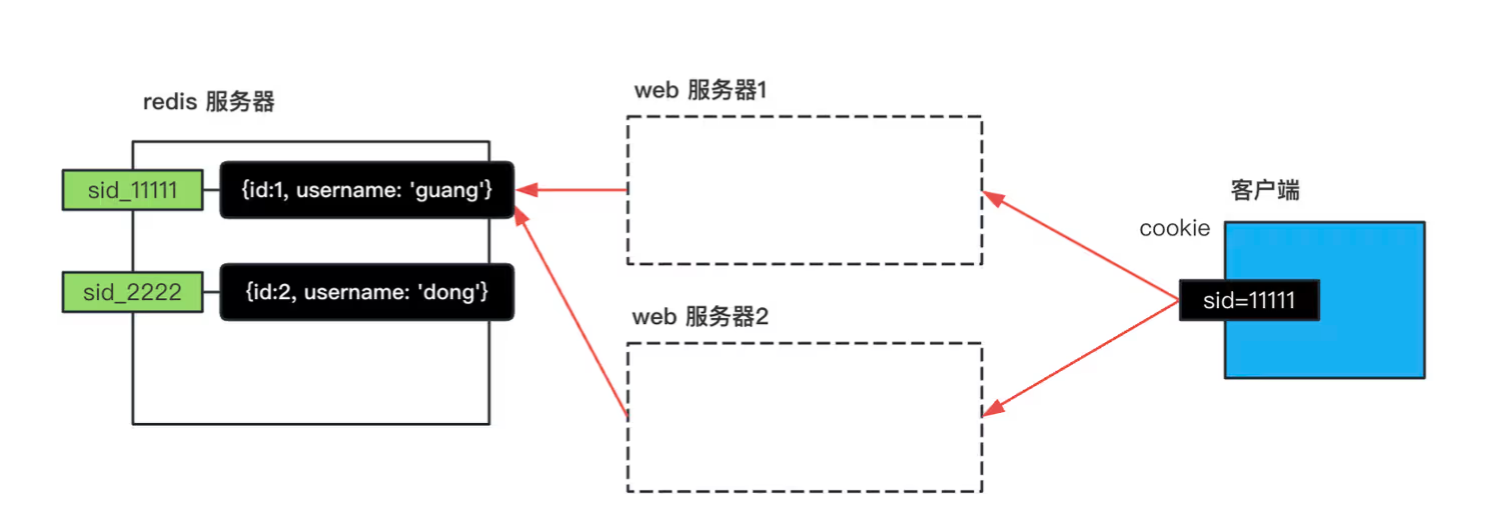
Redis 实现分布式 Session
<font style="color:rgb(37, 41, 51);">代码:nest-study\</font>redis-session-test
session 是在服务端内存存储会话数据,通过 cookie 中的 session id 关联。但它不支持分布式,换台机器就不行了。jwt 是在客户端存储会话数据,所以天然支持分布式。所以需要使用 redis 自己实现了分布式的 session。
本博客所有文章除特别声明外,均采用 CC BY-SA 4.0 协议 ,转载请注明出处!