Nest 启动!
为啥要用 nest
众所周知 express 是基于中间件的洋葱模型处理请求、响应的库,它并没有提供组织代码的架构特性,代码可以写的很随意。而为了更好的可维护性,我们都会用 Nest 这种一站式企业级开发框架。就像 java 里会用 Spring 框架一样。Nest 底层是 express 但也不完全是,它内部实现是基于 interface 的,而且提供了 @nestjs/platform-express、@nestjs/platform-fastify 这两个 adapter 包。这样就可以轻松的切换 express、fastify 或者其他的 http 请求处理的库。
启动
1 | |
[Nest Cli](https://juejin.cn/book/7226988578700525605/section/7227320664863014968) 有创建新项目的 <font style="color:rgb(37, 41, 51);">nest new</font>,有创建某些代码的 <font style="color:rgb(37, 41, 51);">nest generate</font>,还有编译构建的 <font style="color:rgb(37, 41, 51);">nest build</font>,开发模式的 <font style="color:rgb(37, 41, 51);">nest start</font> 等。非常全面
5 种 http/https 的数据传输方式:
其中前两种是 url 中的:
- url param: url 中的参数 (
<font style="color:rgb(37, 41, 51);">url/:param</font>),Nest 中使用 @Param 来取
1 | |
- query:url 中 ? 后的字符串(
<font style="color:rgb(37, 41, 51);">url?name=小把&age=99</font>),Nest 中使用 @Query 来取
1 | |
后三种是 body 中的:
- form urlencoded: 类似 query 字符串,只不过是放在 body 中。Nest 中使用 @Body 来取,axios 中需要指定 content type 为 application/x-www-form-urlencoded,并且对数据用 qs 或者 query-string 库做 url encode
- json: json 格式的数据。Nest 中使用 @Body 来取,axios 中不需要单独指定 content type 为 application/json,axios 内部会处理。
1 | |
- form data:通过 —– 作为 boundary 分隔的数据。主要用于传输文件,Nest 中要使用 FilesInterceptor 来处理其中的 binary 字段,用 @UseInterceptors 来启用,其余字段用 @Body 来取。axios 中需要指定 content type 为 multipart/form-data,并且用 FormData 对象来封装传输的内容。
1 | |
IOC<font style="color:rgb(37, 41, 51);">(Inverse Of Control)控制反转</font>
后端系统中,会有很多对象:
<font style="color:rgb(37, 41, 51);">Controller</font>对象:接收 http 请求,调用 Service,返回响应<font style="color:rgb(37, 41, 51);">Service</font>对象:实现业务逻辑 Reflector<font style="color:rgb(37, 41, 51);">Repository</font>对象:实现对数据库的增删改查<font style="color:rgb(37, 41, 51);">DataSource</font>对象: 数据库链接<font style="color:rgb(37, 41, 51);">Config</font>对象 配置信息
这些对象有着错综复杂的关系:Controller 依赖了 Service 实现业务逻辑,Service 依赖了 Repository 来做增删改查,Repository 依赖 DataSource 来建立连接,DataSource 又需要从 Config 对象拿到用户名密码等信息。如下:
1 | |
手动创建并组装对象比较麻烦,那么就有了 IOC 机制,它的出现就是为了解决后端复杂依赖。IOC 机制 是在 class 上标识哪些是可以被注入的,它的依赖是什么,然后从入口开始扫描这些对象和依赖,自动创建和组装对象。(不用手动再 new 啦)
Nest 里通过 <font style="color:rgb(37, 41, 51);">@Controller</font> 声明可以被注入的 controller,通过 <font style="color:rgb(37, 41, 51);">@Injectable</font> 声明可以被注入也可以注入别的对象的 provider,然后在 <font style="color:rgb(37, 41, 51);">@Module</font> 声明的模块里引入。
并且 Nest 还提供了 Module 和 Module 之间的<font style="color:rgb(37, 41, 51);">import</font>,可以导入别的模块<font style="color:rgb(37, 41, 51);">exports</font>的 provider 来注入。
Provider
一般情况下,provider 是通过
<font style="color:rgb(37, 41, 51);">@Injectable</font>声明,然后在<font style="color:rgb(37, 41, 51);">@Module</font>的 _providers_ 数组里注册的 class。
常用 providers 的写法:

而下面则是默认写法。provide 可以理解为 token 可以是 string 或 class。再通过 <font style="color:rgb(37, 41, 51);">useClass</font> 指定注入的对象的类:
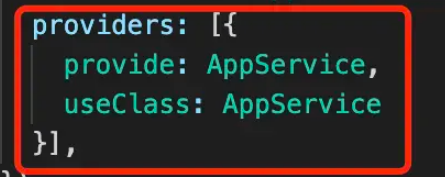
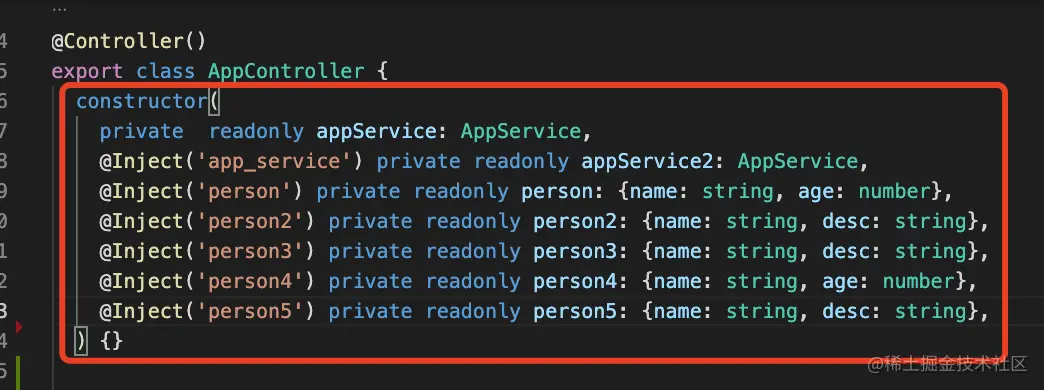
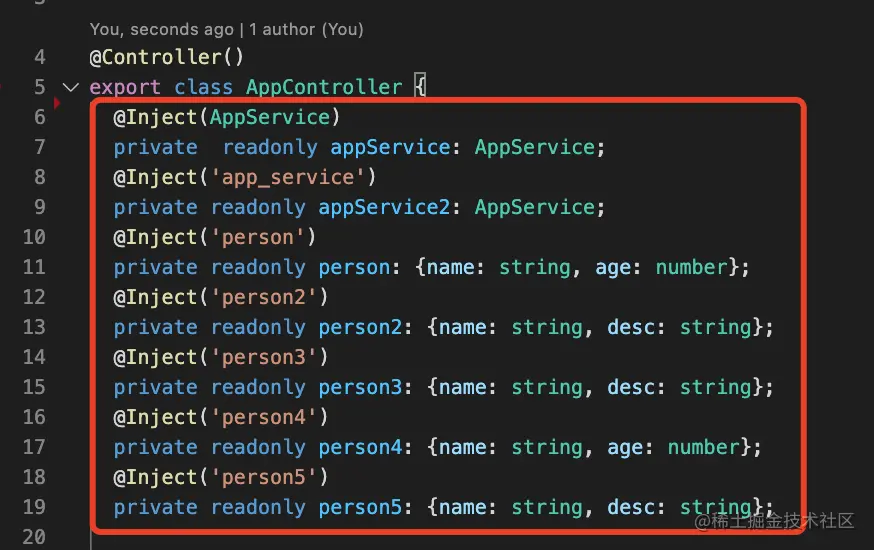
默认的 token 就是 class,这样不用使用 <font style="color:rgb(37, 41, 51);">@Inject</font> 来指定注入的 token。以下是两种 provider 使用方式,构造器注入和声明注入:
注入类型
<font style="color:rgb(37, 41, 51);">useClass</font>指定注入的 class,- 还可以用
<font style="color:rgb(37, 41, 51);">useValue</font>直接指定注入的对象。 - 如果想动态生成对象,可以使用
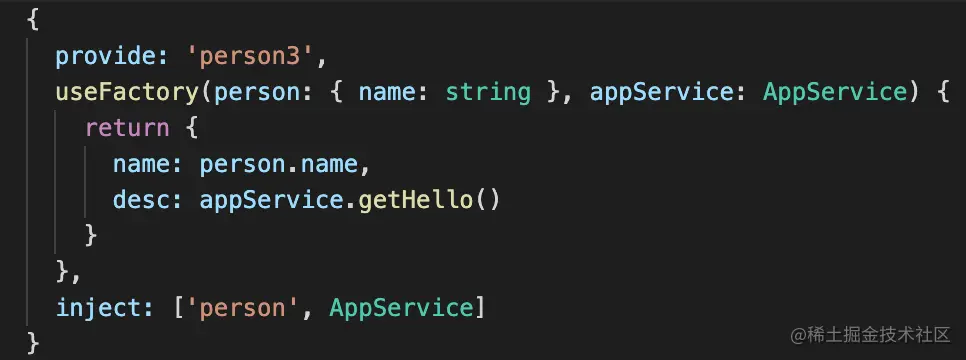
<font style="color:rgb(37, 41, 51);">useFactory</font>,它的参数也注入 IOC 容器中的对象,然后动态返回 provider 的对象。还可以是异步的。 **inject**** 属性用于useFactory。如果 Provider 是通过工厂函数创建的,那么 inject 属性就是一个Provide** 数组,包含了这个工厂函数的依赖项列表:说白了就是这个<u>useFactory</u>的参数列表。- 如果想起别名,可以用
<font style="color:rgb(37, 41, 51);">useExisting</font>给已有的 token,指定一个新 token。
** 在 NestJS 中未使用 **@Injectable()** 装饰器的类如何被注入 **
- 通过
useClass或useValue显式提供类或实例作为provider。 - 通过
useFactory工厂方法显式创建类实例并注入。 - 使用
forwardRef解决循环依赖,显式提供类。 - 从外部模块导入并使用已提供的类。
全局模块和生命周期
模块可以通过 **<font style="color:rgb(37, 41, 51);">@Global</font>** 声明为全局的,这样它 <font style="color:rgb(37, 41, 51);">exports</font> 的 <font style="color:rgb(37, 41, 51);">provider</font> 就可以在各处使用了,不需要 <font style="color:rgb(37, 41, 51);">imports</font>。
provider、controller、module 都支持启动和销毁的生命周期函数,并且这些生命周期函数都支持 async 的方式:
<font style="color:rgb(37, 41, 51);">OnModuleInit</font><font style="color:rgb(37, 41, 51);">OnApplicationBootstrap</font><font style="color:rgb(37, 41, 51);">OnModuleDestroy</font><font style="color:rgb(37, 41, 51);">BeforeApplicationShutdown</font><font style="color:rgb(37, 41, 51);">OnApplicationShutdown</font>
可以在其中做一些初始化、销毁的逻辑,比如 <font style="color:rgb(37, 41, 51);">onApplicationShutwon</font> 里通过 <font style="color:rgb(37, 41, 51);">moduleRef.get</font> 取出一些 <font style="color:rgb(37, 41, 51);">provider</font>,执行关闭连接等销毁逻辑。
1 | |
AOP 架构
AOP 则是把通用逻辑抽离出来,通过切面的方式添加到某个地方,可以复用和动态增删切面逻辑。具有松耦合、易于维护和扩展的特性
Nest 基于 express 这种 http 平台做了一层封装,应用了 MVC、IOC、AOP 等架构思想。
MVC 就是 Model、View Controller 的划分,请求先经过 Controller,然后调用 Model 层的 Service、Repository 完成业务逻辑,最后返回对应的 View。
IOC 是指 Nest 会自动扫描带有 <font style="color:rgb(37, 41, 51);">@Controller</font>、<font style="color:rgb(37, 41, 51);">@Injectable</font> 装饰器的类,创建它们的对象,并根据依赖关系自动注入它依赖的对象,免去了手动创建和组装对象的麻烦。
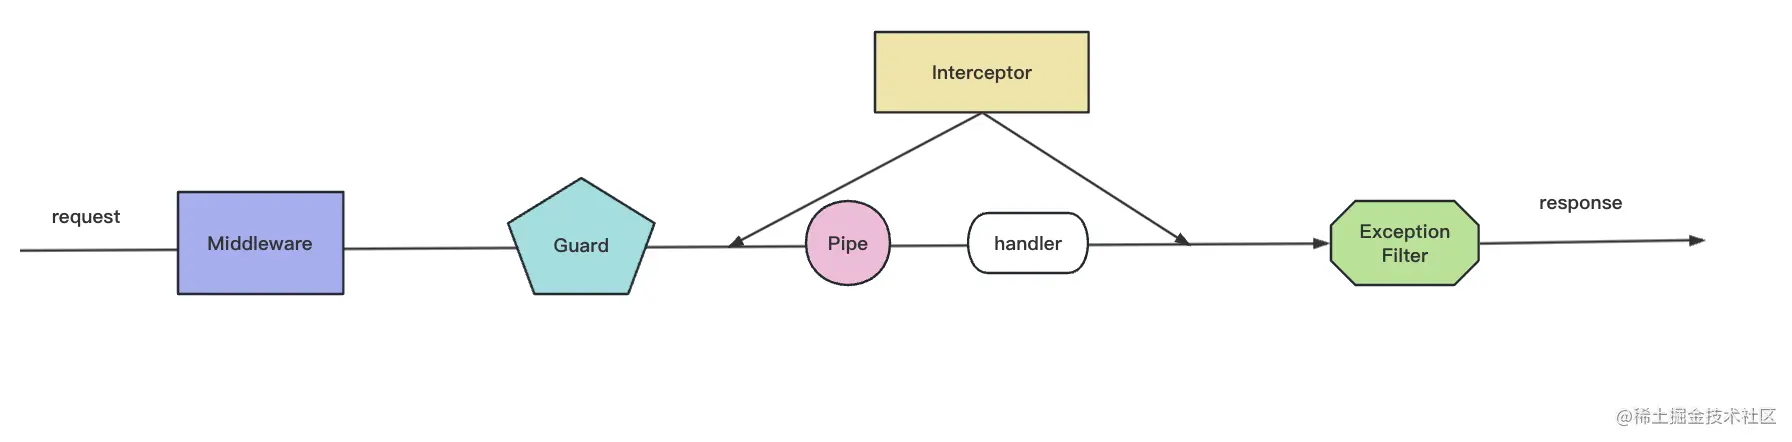
Nest 的**<font style="color:rgb(37, 41, 51);">Middleware(中间件)、Guard(守卫)、Interceptor(拦截器)、Pipe(管道)、ExceptionFilter(异常处理)</font>**都是 AOP 思想的实现,只不过是不同位置的切面,它们都可以灵活的作用在某个路由或者全部路由,这就是 AOP 的优势。
调用顺序:
<font style="color:rgb(37, 41, 51);">Middleware</font>是 Express 的概念,在最外层,到了某个路由之后,会先调用<font style="color:rgb(37, 41, 51);">Guard</font>,<font style="color:rgb(37, 41, 51);">Guard</font>用于判断路由有没有权限访问,然后会调用<font style="color:rgb(37, 41, 51);">Interceptor</font>,对<font style="color:rgb(37, 41, 51);">Contoller</font>前后扩展一些逻辑,在到达目标<font style="color:rgb(37, 41, 51);">Controller</font>之前,还会调用<font style="color:rgb(37, 41, 51);">Pipe</font>来对参数做检验和转换。所有的<font style="color:rgb(37, 41, 51);">HttpException</font>的异常都会被<font style="color:rgb(37, 41, 51);">ExceptionFilter</font>处理,返回不同的响应。
Middleware(中间件)
全局中间件算是 Express 的那种中间件,在请求之前和之后加入一些处理逻辑,每个请求都会走到这里。
用法是 Module 实现 <font style="color:rgb(37, 41, 51);">NestModule</font> 的 configure 方法,调用 apply 和 forRoutes 指定什么中间件作用于什么路由。
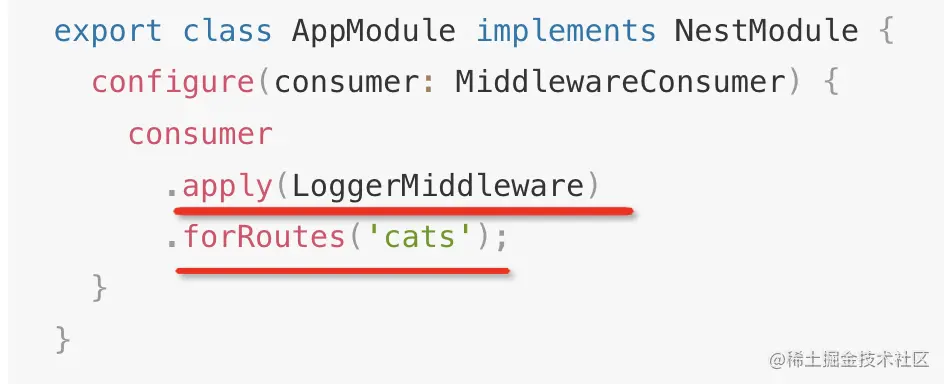
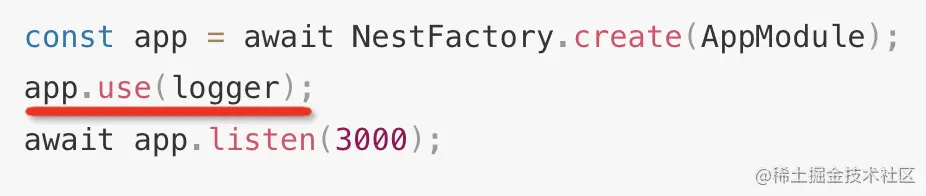
app.use 也可以应用中间件,但更建议在 AppModule 里的 configure 方法里指定。
但是它也不全是是 Express 的 middleware,虽然都有 request、response、next 参数,但是它可以从 Nest 的 IOC 容器注入依赖,还可以指定作用于哪些路由。
1 | |
Nest 还有个 <font style="color:rgb(37, 41, 51);">@Next</font> 装饰器,这个是用于调用下个 handler (controller function) 处理的,当用了这个装饰器之后,Nest 就不会把 handler 返回值作为响应了。
1 | |
Guard(守卫)
Guard 要实现 <font style="color:rgb(37, 41, 51);">CanActivate</font> 接口,实现 canActivate 方法,可以从 context 拿到请求的信息,然后做一些权限验证等处理之后返回 true 或者 false。
1 | |
Interceptor(拦截器)
Interceptor 要实现 <font style="color:rgb(37, 41, 51);">NestInterceptor</font> 接口,实现 intercept 方法,调用 next.handle() 就会调用目标 Controller,可以在之前和之后加入一些处理逻辑。
nest 的 interceptor 还可以用了 rxjs 的 operator 来处理响应,常用的 operator 如下:
<font style="color:rgb(37, 41, 51);">tap</font>: 不修改响应数据,执行一些额外逻辑,比如记录日志、更新缓存等<font style="color:rgb(37, 41, 51);">map</font>:对响应数据做修改,一般都是改成 {code, data, message} 的格式<font style="color:rgb(37, 41, 51);">catchError</font>:在 exception filter 之前处理抛出的异常,可以记录或者抛出别的异常<font style="color:rgb(37, 41, 51);">timeout</font>:处理响应超时的情况,抛出一个 TimeoutError,配合 catchErrror 可以返回超时的响应
1 | |
此外,interceptor 也是可以注入依赖的,你可以通过注入模块内的各种 provider。
全局 interceptor 可以通过 <font style="color:rgb(37, 41, 51);">APP_INTERCEPTOR</font> 的 token 声明,这种能注入依赖,而app.useGlobalInterceptors 无法注入依赖。**<font style="color:rgb(37, 41, 51);">同理 filter、guard、pipe 一样遵循以上规则</font>**
1 | |
interceptor 与 middleware 的区别
它们功能类似,但也有不同,interceptor 可以拿到目标 class、handler 等,进而通过 reflector 拿到它的 metadata 等信息。也可以调用 rxjs 的 operator 来处理响应,interceptor 更适合处理具体的业务逻辑。middleware 更适合处理通用的逻辑。
Pipe(管道)
Pipe 要实现 <font style="color:rgb(37, 41, 51);">PipeTransform</font> 接口,实现 transform 方法,里面可以对传入的参数值 value 做参数验证,比如格式、类型是否正确,不正确就抛出异常。也可以做转换,返回转换后的值。
在 pipe 里可以拿到 装饰器 和 handler 参数 的各种信息,基于这些来实现校验和转换就是很简单的事情了。
1 | |
metadata.**metatype** 可以拿到参数的 Ts 类型
内置的有 9 个 Pipe,从名字就能看出它们的意思:一般用在某个参数中。
<font style="color:rgb(37, 41, 51);">ParseIntPipe</font><font style="color:rgb(37, 41, 51);">ParseBoolPipe</font><font style="color:rgb(37, 41, 51);">ParseUUIDPipe</font><font style="color:rgb(37, 41, 51);">DefaultValuePipe</font><font style="color:rgb(37, 41, 51);">ParseEnumPipe</font><font style="color:rgb(37, 41, 51);">ParseFloatPipe</font><font style="color:rgb(37, 41, 51);">ParseFilePipe</font><font style="color:rgb(37, 41, 51);">ValidationPipe</font><font style="color:rgb(37, 41, 51);">ParseArrayPipe</font>
以上 Pipe 几乎所有都可以处理 Get 请求的参数:
1 | |
而 Post 请求,接收 post 请求的方式是声明一个 dto class(数据传输对象)。对它做验证要用 使用 **<font style="color:rgb(37, 41, 51);">ValidationPipe</font>** 得安装以下依赖 <font style="color:rgb(37, 41, 51);">npm install -D class-validator class-transformer</font> (ParseArrayPipe 也需要这个两依赖)。以下简单实现了一个 ValidationPipe
1 | |
class-validator 验证 dto 的方法汇总
class-validator 支持很多种验证规则,比如邮箱、域名、长度、值的范围等,而且错误消息也可以自定义。
1 | |
错误内容自定:
1 | |

ExceptionFilter(异常处理)
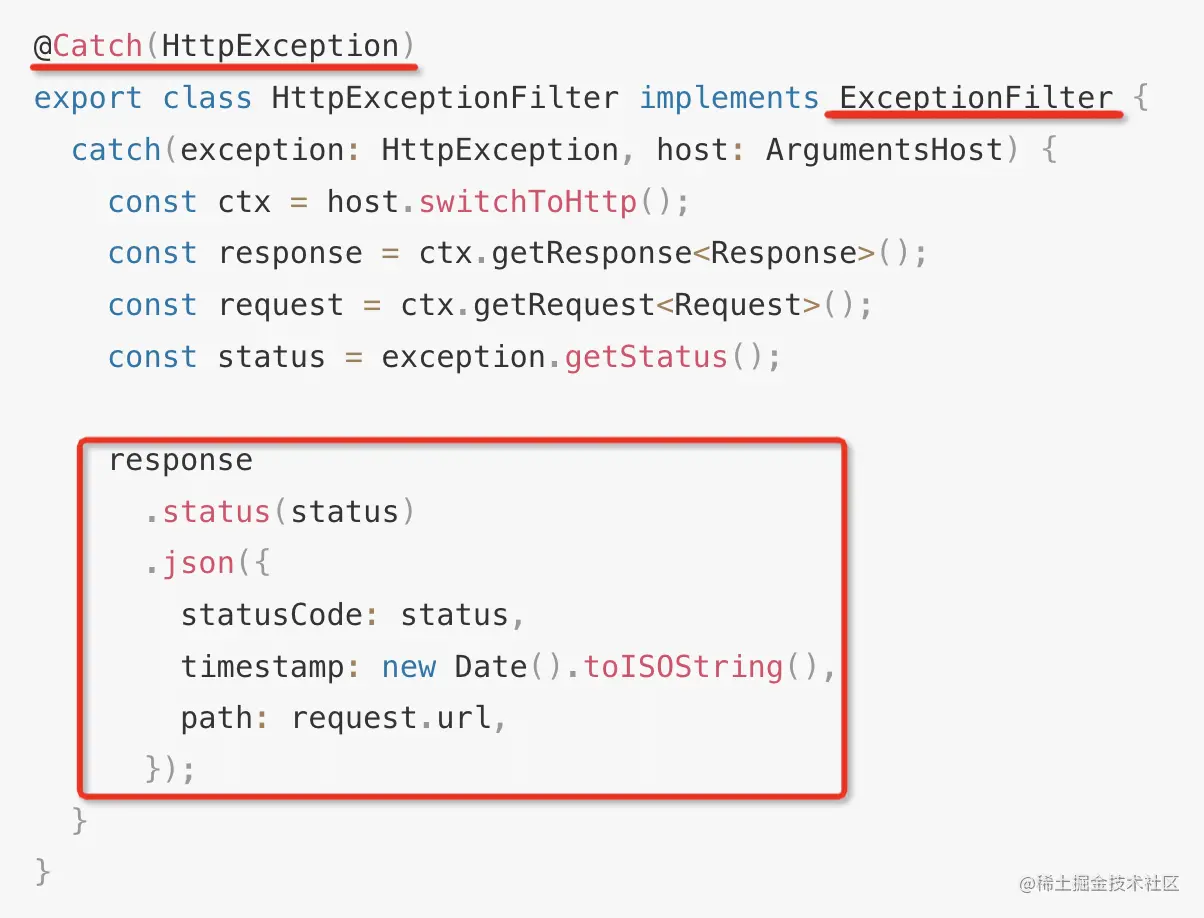
首先要实现 <font style="color:rgb(37, 41, 51);">ExceptionFilter</font> 接口,实现 catch 方法,就可以拦截异常了,但是要拦截什么异常还需要用 <font style="color:rgb(37, 41, 51);">@Catch</font> 装饰器来声明,拦截了异常之后,可以返回对应的响应,给用户更友好的提示。
Nest 内置了很多 http 相关的异常,都是 HttpException 的子类:
<font style="color:rgb(37, 41, 51);">BadRequestException</font><font style="color:rgb(37, 41, 51);">UnauthorizedException</font><font style="color:rgb(37, 41, 51);">NotFoundException</font><font style="color:rgb(37, 41, 51);">ForbiddenException</font><font style="color:rgb(37, 41, 51);">NotAcceptableException</font><font style="color:rgb(37, 41, 51);">RequestTimeoutException</font><font style="color:rgb(37, 41, 51);">ConflictException</font><font style="color:rgb(37, 41, 51);">GoneException</font><font style="color:rgb(37, 41, 51);">PayloadTooLargeException</font><font style="color:rgb(37, 41, 51);">UnsupportedMediaTypeException</font><font style="color:rgb(37, 41, 51);">UnprocessableException</font><font style="color:rgb(37, 41, 51);">InternalServerErrorException</font><font style="color:rgb(37, 41, 51);">NotImplementedException</font><font style="color:rgb(37, 41, 51);">BadGatewayException</font><font style="color:rgb(37, 41, 51);">ServiceUnavailableException</font><font style="color:rgb(37, 41, 51);">GatewayTimeoutException</font>
装饰器列表
<font style="color:rgb(37, 41, 51);">@Module</font>: 声明 Nest 模块<font style="color:rgb(37, 41, 51);">@Controller</font>:声明模块里的 controller<font style="color:rgb(37, 41, 51);">@Injectable</font>:声明模块里可以注入的 provider<font style="color:rgb(37, 41, 51);">@Inject</font>:通过 token 手动指定注入的 provider,token 可以是 class 或者 string<font style="color:rgb(37, 41, 51);">@Optional</font>:声明注入的 provider 是可选的,可以为空,就是没有找到这个 provider 也不会报错<font style="color:rgb(37, 41, 51);">@Global</font>:声明全局模块<font style="color:rgb(37, 41, 51);">@Catch</font>:声明 exception filter 处理的 exception 类型<font style="color:rgb(37, 41, 51);">@UseFilters</font>:路由级别使用 exception filter<font style="color:rgb(37, 41, 51);">@UsePipes</font>:路由级别使用 pipe<font style="color:rgb(37, 41, 51);">@UseInterceptors</font>:路由级别使用 interceptor<font style="color:rgb(37, 41, 51);">@SetMetadata</font>:在 class 或者 handler 上添加 metadata<font style="color:rgb(37, 41, 51);">@Get、@Post、@Put、@Delete、@Patch、@Options、@Head</font>:声明 get、post、put、delete、patch、options、head 的请求方式<font style="color:rgb(37, 41, 51);">@Param</font>:取出 url 中的参数,比如 /aaa/:id 中的 id<font style="color:rgb(37, 41, 51);">@Query:</font>取出 query 部分的参数,比如 /aaa?name=xx 中的 name<font style="color:rgb(37, 41, 51);">@Body</font>:取出请求 body,通过 dto class 来接收<font style="color:rgb(37, 41, 51);">@Headers</font>:取出某个或全部请求头<font style="color:rgb(37, 41, 51);">@Session</font>:取出 session 对象,需要启用 express-session 中间件<font style="color:rgb(37, 41, 51);">@HostParm</font>: 取出 host 里的参数<font style="color:rgb(37, 41, 51);">@Req、@Request</font>:注入 request 对象<font style="color:rgb(37, 41, 51);">@Res、@Response</font>:注入 response 对象,一旦注入了这个 Nest 就不会把返回值作为响应了,除非指定 passthrough 为 true<font style="color:rgb(37, 41, 51);">@Next</font>:注入调用下一个 handler 的 next 方法<font style="color:rgb(37, 41, 51);">@HttpCode</font>: 修改响应的状态码<font style="color:rgb(37, 41, 51);">@Header</font>:修改响应头<font style="color:rgb(37, 41, 51);">@Headers</font>:查询响应头<font style="color:rgb(37, 41, 51);">@Redirect</font>:指定重定向的 url<font style="color:rgb(37, 41, 51);">@Render</font>:指定渲染用的模版引擎
自定义装饰器
class 装饰器和方法装饰器一样,组合多个方法装饰器,可以使用 **<font style="color:rgb(37, 41, 51);">applyDecorators</font>**
1 | |
通过 **<font style="color:rgb(37, 41, 51);">createParamDecorator</font>** 来创建参数装饰器, 它能拿到 <font style="color:rgb(37, 41, 51);">ExecutionContext</font>,进而拿到 reqeust、response,可以实现很多内置装饰器的功能,比如 @Query、@Headers 等装饰器。
1 | |
ExecutionContext: 切换不同上下文
为了让 Filter、Guard、Exception Filter 支持 <font style="color:rgb(37, 41, 51);">http、ws、rpc(tcp微服务)</font> 等场景下复用,Nest 设计了 <font style="color:rgb(37, 41, 51);">ArgumentHost</font> 和 <font style="color:rgb(37, 41, 51);">ExecutionContext</font> 类。
ArgumentHost 可以通过 getArgs 或者 getArgByIndex 拿到上下文参数,比如 request、response、next 等。
更推荐的方式是根据 getType 的结果分别 switchToHttp、switchToWs、swtichToRpc,然后再取对应的 argument。
1 | |
而作为<font style="color:rgb(37, 41, 51);">ArgumentHost</font> 子类的 <font style="color:rgb(37, 41, 51);">ExecutionContext</font> 还提供 getClass、getHandler 方法,可以结合 reflector 来取出其中的 metadata。
forwardRef 处理循环依赖
Module 之间可以相互 imports,Provider 之间可以相互注入,这两者都会形成循环依赖。
解决方式就是两边都用 forwardRef 来包裹下。
它的原理就是 nest 会先创建 Module、Provider,之后再把引用转发到对方,也就是 forward ref。
1 | |
动态模块
Module 可以传入 options 动态产生,这叫做动态 Module,你还可以把传入的 options 作为 provider 注入到别的对象里。在 typeorm、mongoose 等模块中会大量使用
Nest 约定(建议) 的动态产生 Module 的方法名有 register、forRoot、forFeature 3 种。
- register:用一次注册一次
- forRoot:只注册一次,用多次,一般在 AppModule 引入
- forFeature:用了 forRoot 之后,用 forFeature 传入局部配置,一般在具体模块里 imports
并且这些方法都可以写 xxxAsync 版本,也就是传入 useFactory 等 option,内部注册异步 provider。
1 | |
这个过程也可以用 <font style="color:rgb(37, 41, 51);">ConfigurableModuleBuilder</font> 来生成。通过 <font style="color:rgb(37, 41, 51);">setClassMethodName</font> 设置方法名,通过 <font style="color:rgb(37, 41, 51);">setExtras</font> 设置额外的 options 处理逻辑。
1 | |
文件上传
Nest 的文件上传也是基于 **<font style="color:rgb(37, 41, 51);">multer</font>** 实现的,它对 multer api 封装了一层,提供了 <font style="color:rgb(37, 41, 51);">FileInterceptor</font>、<font style="color:rgb(37, 41, 51);">FilesInterceptor</font>、<font style="color:rgb(37, 41, 51);">FileFieldsInterceptor</font>、<font style="color:rgb(37, 41, 51);">AnyFilesInterceptor</font> 的拦截器,分别用到了 multer 包的 single、array、fields、any 方法。
1 | |
使用前推荐先安装类型:<font style="color:rgb(37, 41, 51);">npm install -D @types/multer</font>
它们把文件解析出来,放到 request 的某个属性上,然后再用 <font style="color:rgb(37, 41, 51);">@UploadedFile</font>、<font style="color:rgb(37, 41, 51);">@UploadedFiles</font> 的装饰器取出来传入 handler。
并且这个过程还可以使用 <font style="color:rgb(37, 41, 51);">ParseFilePipe</font> 来做文件的验证,它内置了 <font style="color:rgb(37, 41, 51);">MaxFileSizeValidator</font>、<font style="color:rgb(37, 41, 51);">FileTypeValidator</font>,你也可以实现自己的 FileValidator。
1 | |
Logger 日志
日志打印可以用 Nest 的 Logger,它支持在创建应用的时候指定 logger 是否开启,打印的日志级别,还可以自定义 logger。
1 | |
自定义 Logger 需要实现 LoggerService 接口,或者继承 ConsoleLogger 然后重写部分方法。
1 | |
如果想在 Logger 注入一些 provider,就需要创建应用时设置 <font style="color:rgb(37, 41, 51);">bufferLogs 为 true</font>,然后用 <font style="color:rgb(37, 41, 51);">app.useLogger(app.get(xxxLogger))</font> 来指定 Logger。
1 | |
可以把这个自定义 Logger 封装到全局模块,或者动态模块里。但一般情况下,直接使用 Logger 就可以啦
环境配置
nodejs 本身可以通过 <font style="color:rgb(37, 41, 51);">dotenv</font>、<font style="color:rgb(37, 41, 51);">js-yaml</font> 读取 .env 和 yaml 的配置文件中的信息。然后通过 NODE_ENVIRONMENT (其他名字也可) 来切换不同路径的配置文件,实现开发、生产环境的配置切换。
<font style="color:rgb(37, 41, 51);">export NODE_ENVIRONMENT='production'</font>
yaml 的格式更适合有层次关系的配置,而 .env 更适合简单的配置。
1 | |
而 nest 中有现成的包 <font style="color:rgb(37, 41, 51);">@nestjs/config</font>,使用 ConfigModule.forRoot 可以读取 .env 配置文件,然后注入 ConfigService 来取配置。也可通过 ConfigModule.forFeature 来注册局部配置。
1 | |
<font style="color:rgb(37, 41, 51);">@nestjs/config</font> 可接受 .env,或是 ts 文件的配置文件,或是 yaml 格式转为 ts 格式也可以
1 | |
env 加入 assets(dist)中
如果用了 .env 文件,需要保证它在 src 下,并且要在 <font style="color:rgb(37, 41, 51);">nest-cli.json</font> 里配置 assets 和 watchAssets,不然 build 的时候不会复制到 dist 下。
1 | |
本博客所有文章除特别声明外,均采用 CC BY-SA 4.0 协议 ,转载请注明出处!